Creating a D2V Project (Using DGIndex)
Original Page URL: https://www.digital-digest.com/articles/Creating_D2V_Project_page1.html
Author/Publisher: DVDGuy
Date Added: Apr 8, 2007
Date Updated: Apr 8, 2007
This guide follows in the footsteps on our very old Creating a DVD2AVI Project guide. DGMPGDec/DGIndex is a enhanced and improved version of DVD2AVI.
DGMPGDec/DGIndex allows you to create a D2V project file from various input source types (pretty much any MPEG-1/2 file). The D2V file can then be loaded into conversions tools like MeGUI just like any type of input and converted to whatever format you wish.
Software you'll need:
- Installation: Download the DGMPGDec/DGIndex package (usually there is an older stable release, and a newer beta version - the beta version should be stable enough). It's just a ZIP file, so extract it to a directory on your hard-drive.
- Start DGIndex using DGIndex.exe. From the "File" menu, select "Open" (or press the "F2" shortcut key). Load in your MPEG files (in the screenshot below I am loading several DVD VOB files, making sure they are in the correct order).
- From the "Video" drop down menu, select "Field Operations" and select the "Honor Pulldown Flags" option.
- We will now play back the loaded files to allow DGIndex to analyze the files and to give us some statistics for them. Press "F6" to start the playback, or choose the "Play" option from the "File" menu (you can first skip to a section in the movie, if you need to). You don't need to play back the whole movie, just enough to allow DGIndex to get a good idea what the file is (a few minutes should be enough) - press "Esc" to stop the playback. The "Information" window should show up and statistics will be shown there:
- Video Field Operations: A lot of useful information is recorded here (you might want to take a screenshot for later use), but the ones we are interested in for now are "Frame Rate" and "Frame Type", which we will use to select a proper "Field Operation" setting:
- Frame Rate: 20 FPS: You have a PAL video, and you probably have the "Forced Film" option selected in "Video -> Field Operations". Change this option to "Honor Pulldown Flags" and playback again to get the correct (25 FPS) frame rate.
- Frame Rate: 25 FPS: You have a PAL video. You don't need to change any settings.
- Frame Rate: 29.97 FPS: If the "Video Type" shows "Film" at a percentage of 95% of higher, then you need to select the "Forced Film" option from "Video -> Field Operations". If the percentage is less than 95%, set "Video -> Field Operations" to "Honor Pulldown Flags", and you will need to perform IVTC (Inverse Telecine) on the video file later on using your conversion tool (make a mental note of this now).
- Frame Rate: 23.976 FPS: If the "Video Type" shows "Film" at a percentage of 95% of higher, then it means you have already selected
"Forced Film" option from "Video -> Field Operations" and that everything is fine. If the percentage is less than 95%, set "Video -> Field Operations" to "Honor Pulldown Flags", and you will need to perform IVTC (Inverse Telecine) on the video file later on using your conversion tool (make a mental note of this now).
- Still looking at the "Information" window, the right hand side lists the available audio tracks in the video. It shows the encoding type (AC3, DTS, PCM ...), channels (2/0, 3/2 ... front/rear) and bitrate (192, 384 ...). From this, you can normally tell which audio track is which (first track is almost always the primary English track, 2/0 tracks usually commentary tracks if the DVD does not have a stereo version of the movie audio). Which brings us to ...
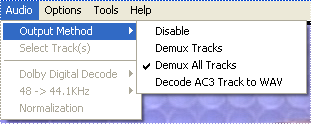
- Audio Demultiplexing: From the "Audio" drop down menu, you can select which audio track you wish to use in the project (if the input has more than one audio track), and also the output method to be used. Select "Audio -> Output Method -> Demux All Tracks" to get DGIndex to extract all the audio tracks and then output them to separate files (one file per track, in its native format, eg. AC3, DTS, PCM), or use the "Demux Tracks" option to demux the currently selected track. The output audio file (produced when you save the project 2 steps from now) will have a filename similar to "Filename AC3 T01 3_2ch 384Kbps DELAY -320ms.ac3", which contains all the information you need to know about the audio track (Track 01, 3/2 channels, 384 Kbps, -320 ms delay).
- You can use the [ and ] buttons to mark in and out the section of the video you want the project to use, which makes it very handy to only convert a specific section of video.
- All we have to do now is to save the project (File -> Save Project, or F4) - and demuxed audio files will be saved in the same directory as your D2V file.
- We're done

|


