Page 1 of 3: Using TMPGEnc: Converting DivX/XviD files to MPEG 2
Software you will need:
VirtualDub - Freeware
TMPGEnc - Freeware
The DVD you are going to create depends at the quality of the DivX file. If you have a good quality DivX file, the result is going to be good. Generally the DVD will have the same quality as your .avi/DivX file. Do not except the quality to get any better!! Also this guide is for DivX files which contain Mp3 audio and not AC3 audio (Although you may be able to use this guide on DivX files that have AC3 audio).
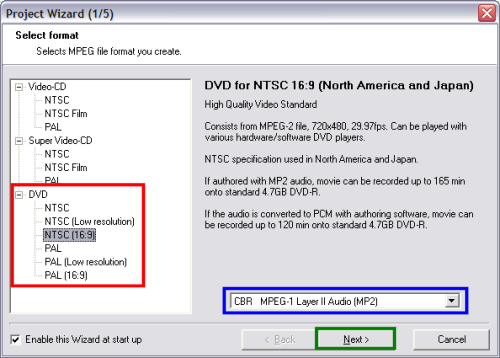
Let's start by opening up TMPGEnc. After it starts, the "Wizard" should come up (if it doesn't, click "File" the "Project Wizard"). Now we are going to tell TMPGEnc what kind of DVD to create, so go ahead and click "NTSC 16X9". Most often your DivX files are in 16X9 aspect ratio, so you need to keep it the same (red). Then down at the bottom, make sure the box says "CBR MPEG-1 Layer II Audio (MP2)" (blue). (Screen Shot Below)

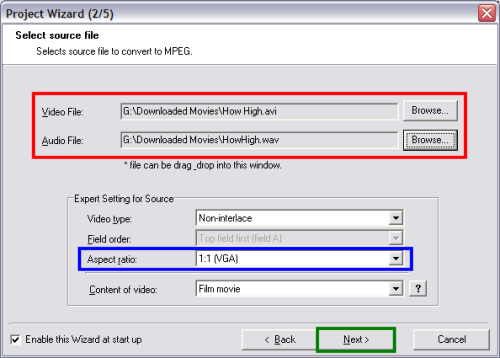
After clicking the "Next" button, this screen should appear. Here you will select .avi/DivX file by clicking the "Browse" button at the end of the "Video" box at the top (red). It should automatically load the "Audio" for you, if it doesn't locate the audio file that is associated with that .avi/DivX file and load it via the "Browse" button just like you did the "Video". (If after you convert there is no audio, simply follow this guide to save it as a .wav file. After that you would follow this guide and insert the .wav you made via the browse button for the audio) In the "Aspect Ratio" box, you can leave "1:1 (VGA)" or you can specify if you know for sure what aspect ratio your file is in (blue). Then click "Next". (Screen Shot Below)

VirtualDub - Freeware
TMPGEnc - Freeware
The DVD you are going to create depends at the quality of the DivX file. If you have a good quality DivX file, the result is going to be good. Generally the DVD will have the same quality as your .avi/DivX file. Do not except the quality to get any better!! Also this guide is for DivX files which contain Mp3 audio and not AC3 audio (Although you may be able to use this guide on DivX files that have AC3 audio).
Let's start by opening up TMPGEnc. After it starts, the "Wizard" should come up (if it doesn't, click "File" the "Project Wizard"). Now we are going to tell TMPGEnc what kind of DVD to create, so go ahead and click "NTSC 16X9". Most often your DivX files are in 16X9 aspect ratio, so you need to keep it the same (red). Then down at the bottom, make sure the box says "CBR MPEG-1 Layer II Audio (MP2)" (blue). (Screen Shot Below)

After clicking the "Next" button, this screen should appear. Here you will select .avi/DivX file by clicking the "Browse" button at the end of the "Video" box at the top (red). It should automatically load the "Audio" for you, if it doesn't locate the audio file that is associated with that .avi/DivX file and load it via the "Browse" button just like you did the "Video". (If after you convert there is no audio, simply follow this guide to save it as a .wav file. After that you would follow this guide and insert the .wav you made via the browse button for the audio) In the "Aspect Ratio" box, you can leave "1:1 (VGA)" or you can specify if you know for sure what aspect ratio your file is in (blue). Then click "Next". (Screen Shot Below)


