Step 1a
- Open VCDEasy, and set everything according to your specific movie, and
follow the example below. Make sure you select the standard in which
your movie has been encoded, to either "PAL"
or "NTSC" so the Chapters will
be at the right spots.
(* NOTE:
Please do not create blank spaces in the Cue/Bin name, as CDRDao may
have a problem burning it later on.*)

Step 1b - Press the "Add Files" button and select the first of the two files you encoded earlier.

Step 1c - Change the "Volume Label" to reflect the
name of the Movie, and also select the "CD files" location
by using "Browse"

Step 2 - On the "Options" tab you can write down the
name of the "Album" and also enable the "Use Playback Control
(PBC)". it is also possible for you to enable the "CD-i Support" if you want to play
the created movie on a Philips CD-i Player. It is not a required
function, and can save space if you don't need it.

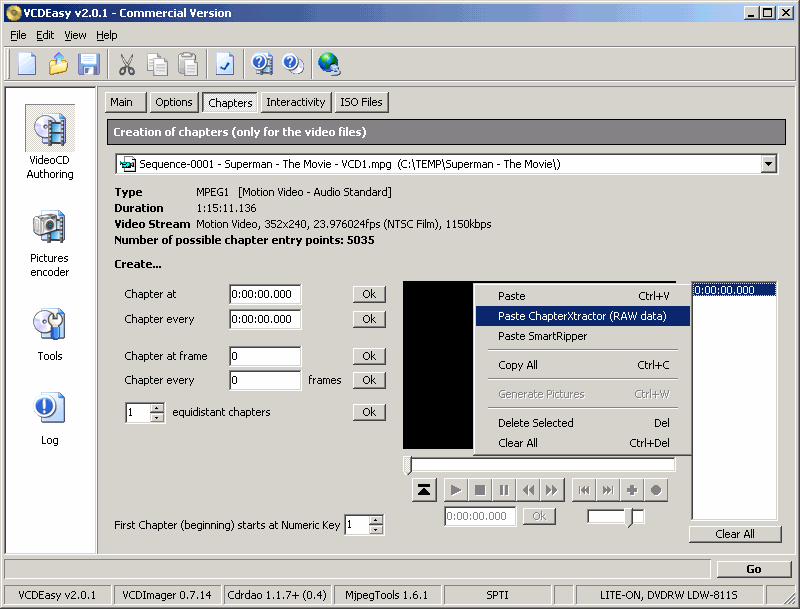
Step 3a - Press the "Chapters" menu item and Here you can select to import the Chapters for your movie, Right Click to get the popup menu so you can import from Smart Ripper or Chapter-X-Tractor.
NOTE: Write
down the "Duration" time of the first half of your movie, you will need
it as a "Start Offset" for the second part. If your movie is only a
single file, then ignore this.

Step 3b - Select the "End offset " for the first part of
the movie, and press the ">>"
button, this will add all the chapters to the "After" table and then press the "Ok"
button when you are done.

Step 4 - Press the "Go" button, VCDEasy will begin
analysing your MPG file and create an Image file for burning.


Step 5b - Change the name of the "CD files" by using the "Browse", so you don't accidently overwrite the previous file.

Step 5c - As in Step 3a and 3b, write in the "Start offset" the exact lenth of the
previous part, in this example it's "1:15:11.139"
and just mark the "End offset"
as the end of the movie, and press the ">>"
button, this will add all the chapters for the second part of the movie
in the correct Chapter Times on the "After"
table.

Step 6 - Press the "Go" button again to create the
second image file of the movie.
