Page 4 of 7: Menu Creation
Step 3: Menu Creation
We are now on the "Select Menu" screen. This is where you can select which menu you want to edit, and the types of menus that you wish to have on your DVD. First, from the "Menu to use" drop down menu, select the types of menus you want to use (if you want menus at all). The "Title" menu is the main index of your DVD (the menu you see when you press the "Title" or "Menu" button on your DVD player). The "Chapters" menu will be a menu of your chapter stops, those that you manually selected in the previous step (if you used the "Create chapters automatically" checkbox, these chapter won't be available in the chapters menu). Also, if you only have one video file/title set, then the default top menu will be your chapter select menu if you've selected the "title and chapter menus" option.

The "Select a menu" drop down box allows you to select which menu to view and edit. The "Main Menu" is your top level menu, and the menus listed under that are those for the titles that have manually added chapters with chapter menus.

The fastest way to create menus is to use an existing template (more can be downloaded from the official website), edit the "Header" text and that's pretty much all you need to do. The instructions below are for editing an existing template or creating your own menus.
If you press the "More" button down the bottom, you will have two further options you can edit. The "Start playback with" option determins what will happen when you insert the disc into your DVD player - you can set it to play any of the video content/titles on your DVD straight away, or go to the menu like on most commercial DVDs. The "When finished playing a title" option let you specify what happens when a title finishes playback (jump to the nest title, repeat the title or jump back to the menu).

Select a menu from this drop down box and press "Edit Menu" to edit this menu (or just click on anywhere on the menu preview to do the same). You will notice that the right hand side now have a list of options that you can use to edit this menu.

First of all, each text, image, interactive content is an object that you can edit, move, delete. You can use your mouse to select (in the menu preview window on the left), and drag these objects to move them, or double-click on them to open up their properties edit window (for certain objects only). The properties window allows you specify the image to be used for title/chapter selection, which can be any frame from the video segment the object activates (eg. for title selections, the image can be anything from the title itself - for chapter selections, the image can be anything from the current chapter). You can undo changes by pressing "Ctrl-Z" or using the "Undo" (and "Redo" buttons on the bottom of the screen). The chapters menu might also have multiple pages, and you can skip to any of these pages using the navigational controls (see below).

You will notice the two sets of dotted rectangles. Try to ensure all the objects are placed inside the inner rectangle, as this is the "safe area" to ensure all objects are viewable on TVs. Some TVs employ overscan that might block out objects outside the inner dotted rectangle, so to be safe, make sure everything is inside the inner dotted rectangle. You might even need to add a border to your background image (see below) so that parts of it don't get cut out when viewing it on a TV, but please note that some TVs employ very little overscan and so you might see the border.


Now let's look at the options on the right hand side. The "Layout" option allows you to position the selectable objects (eg. title selections or chapter selections) in a pre-defined way, both the selection image and text. There are many different positions depending on how many objects you have on screen.

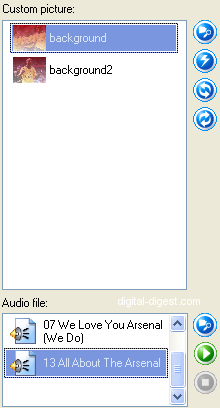
The "Background" option allows you to upload a background image to use, along with an optional audio file that will play back on this menu (background music). A list of all the image and audio files you've used for this project will be displayed in this window, and you can select, apply effects and preview the audio files.

The "Buttons" option allows you to change the styles of the buttons in the menu, as well as the text and numbering style (eg. for the chapter menu). The "Animate Buttons" checkbox here, when checked, will make the buttons animated - what this means is that if the button contains a frame from your video, then animated will change the image in button to playback a short sequence from the movie (eg. the chapter select button will play back a short scene from the chapter) - the amount of time of the playback can be set in the "Automization" section (see below).
The "Font" option allows you to change the font type and color of all the text used on the menu. The font size is automatically selected for you depending on the length of your text (this can be changed if you press the "More" button and change the "Font height calculation mode"). Jumping ahead one option, the "Shadow" option enables shadows for all the objects in the menu (including images, text).
The "Header/Footer" text allows you to edit the title and footer text for the current menu. You can actually position these texts anywhere on the menu, so it does not really have to be in the header or footer positions.
"Automization" allows you to specify the properties of any animation your current menu template might have. The option is grayed out if you do not have any animation in the current menu, but if you have selected the "Animate Buttons" option (see above) for example, then you can specify how long the animation will be before it is looped. Please note that if have have any background music, then the time the music will play (before it loops) will be determined by the "Playing time" setting here - if you do not have any animation in your menu ("Automization" is grayed out), then the background music will be played to the end. Also note that there is a limit to the size of menu animations, and if you exceed it, then Nero will
"Interaction Colors" allows you to specify the color that selectable objects will show when they are highlighted by the DVD player's cursor and when they are being clicked on (Activation) - the colors can be transparent types, or solid ones.
When all these options are used, you are able to create some very good looking and usable menus.

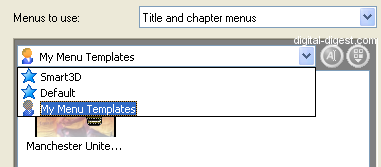
When you have finished editing the menu, press the "Next" button to return to the "Select Menu" screen. You can then proceed to edit the other menus. Before you do that, you can click on the "Save as Template" button to save your menu creation. This allows you to re-use the menu template for other menus in this project or in other projects. The saved templates are available in the template selection menu (just below the "Menu to use" drop down box) under "My Menu Templates".

When you have finished editing all your menus, return to the "Select Menu" screen and press "Next" to proceed to the "Preview" screen.


