Page 1 of 6: Using VirtualDub - Re-encode AVI for standalone compatibility
Software you will need:
Introduction:
Many DVD players are now capable of playing AVI (MPEG-4/DivX/XviD) files. Unfortunately, not all AVI files are compatible with stand alone players. This guide will teach you how to re-encode AVI files so that you can make sure they will have maximum compatibility with stand alone players (although absolute compatibility is hard to ensure). Now because DVD players are different, and newer models will play more types of MPEG-4 files, this guide should only be used if you know that your AVI file isn't standalone compatible (and preferably if you know what types of AVI/MPEG-4 files your DVD player will play). It is very important that you check your DVD player's documentations or their official website to see if they have any information on AVI/MPEG-4 compatibility (eg. for my DVD player, the information can be found on the official website).
This guides goes through some of the common problems you might have in regards to compatibility (see the first section "Reasons for Incompatibility").
Just a note though, when re-encoding, your output will always lose some type of quality compared to the source, whether it be noticeable or not. Your never going to improve quality by encoding with a different codec. The re-encoding instructions in this guide is designed for speed and quality will suffer as a result.
Also, if you want a simple point and click type experience, you can use AutoGK using the instructions listed here (AutoGK Step 1 onwards). You will still need to note what is required for compatibility with your DVD player, and if you don't have access to this information, then you should take note of the "Reasons for Incompatibility" section below in regards to the common requirements to ensure maximum compatibility.
Note: The original method outlined in this guide can be found in this article. Some additions are also based on some excellent suggestions provided by UncasMS.
Reasons for Incompatibility:
As mentioned above, your standalone player will have different criteria to ensure compatibility, but here are some commonly found reasons for incompatibility:
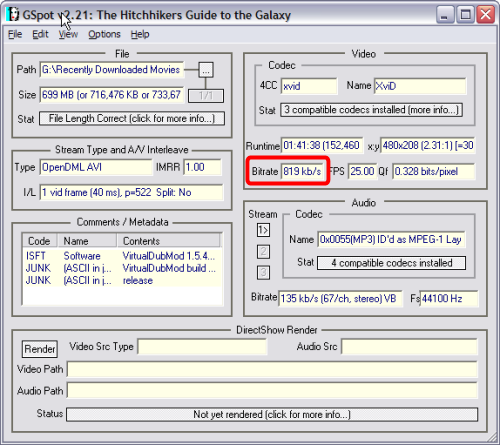
First up, we need to find some information about the AVI file, to ensure that you either match the size of the original file, or to see if the original file's bitrate is too high (see "Reasons for Incompatibility" above). We'll use GSpot, as it give you most of the information you'll need later on. Load the avi file you wish to re-encode into GSpot and write down (or do a screen capture, if you are capable):
The reason you need all of this information is to use it later in a bitrate calculator to set the size of the re-encoded AVI file (eg. if you need the file to fit onto a CD). In actual fact, you can simply enter the "the original bitrate" listed in GSpot into the DivX/XviD codec, and you should get roughly the same sized file, but it won't be as precise as using the built in calculators for the codecs.
After you have gotten it all down, you can close GSpot. (Screen Shot Below)

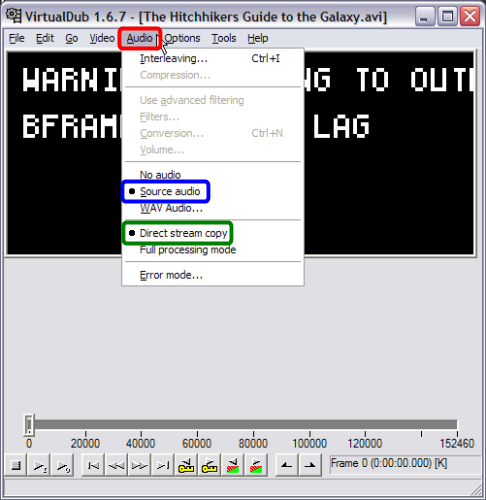
Now start up VirtualDub and load the avi file you wish to re-encode. Select the "Audio" drop down menu at the top (red). Ensure "Source audio" (blue) and "Direct stream copy" (green) are selected.
"Source audio" should be selected by default, and it simply means that VirtualDub will use the audio that was found within the loaded AVI file (as opposed to "No Audio", which uses no audio for the output, and "WAV audio", which allows you to replace the current audio with the audio in a WAV file).
"Direct stream copy" (like the video equivalent) simply means that no processing will be done on the audio, and it will be copied over bit for bit from the loaded AVI file, maintaining the original quality and will be very quick. (Screen Shot Below)

- GSpot or similar
- VirtualDub
- DivX or XviD codec installed
Introduction:
Many DVD players are now capable of playing AVI (MPEG-4/DivX/XviD) files. Unfortunately, not all AVI files are compatible with stand alone players. This guide will teach you how to re-encode AVI files so that you can make sure they will have maximum compatibility with stand alone players (although absolute compatibility is hard to ensure). Now because DVD players are different, and newer models will play more types of MPEG-4 files, this guide should only be used if you know that your AVI file isn't standalone compatible (and preferably if you know what types of AVI/MPEG-4 files your DVD player will play). It is very important that you check your DVD player's documentations or their official website to see if they have any information on AVI/MPEG-4 compatibility (eg. for my DVD player, the information can be found on the official website).
This guides goes through some of the common problems you might have in regards to compatibility (see the first section "Reasons for Incompatibility").
Just a note though, when re-encoding, your output will always lose some type of quality compared to the source, whether it be noticeable or not. Your never going to improve quality by encoding with a different codec. The re-encoding instructions in this guide is designed for speed and quality will suffer as a result.
Also, if you want a simple point and click type experience, you can use AutoGK using the instructions listed here (AutoGK Step 1 onwards). You will still need to note what is required for compatibility with your DVD player, and if you don't have access to this information, then you should take note of the "Reasons for Incompatibility" section below in regards to the common requirements to ensure maximum compatibility.
Note: The original method outlined in this guide can be found in this article. Some additions are also based on some excellent suggestions provided by UncasMS.
Reasons for Incompatibility:
As mentioned above, your standalone player will have different criteria to ensure compatibility, but here are some commonly found reasons for incompatibility:
- The FourCC code (the code which tells the player what kind of file is being played) can sometimes be changed to a more common one to ensure better compatibility. For example, many players prefer "dx50" as the FourCC code, rather than "div3" or "xvid", and it's often possible to make files compatible just by changing the FourCC code (without the need to re-encode). Changing the FourCC code is very easy, and you can do this with a simple tool like AVI FourCC Changer.
- Your MPEG-4/DivX/XviD encoded AVI file includes the use of QPEL (quarter pixels) or GMC (global motion compensation). These are frequently used to improve quality of encodings. Generally, if you can ensure your MPEG-4 encoded file fits the ISO MPEG-4 Simple or Advanced Simple profile (without QPEL or GMC), then the chance your file is compatible would improve.
- The resolution of your AVI file is above that supported by the DVD player. DVD players will normally only support up to 720x576 (PAL) and 720x480 (NTSC) resolutions. Even the DVD players that can upscale to high definition may only accept these resolutions, due to the nature of their MPEG-4 decoding chips. A future version of this guide will include instructions on how to use the resize filter to resize the video.
- If your AVI file uses VBR (variable bitrate) MP3s for audio, these are sometimes not supported by your DVD player. A future version of this guide will include instructions on how to re-encode audio to ensure compatibility. The current version of this guide assumes you have an AVI file with CBR (constant bitrate audio) MP3 audio, as otherwise you will may run into problems using VirtualDub (which has limited audio type support).
- When the AVI file is burned to CD/DVD, the burned disc may have to be in a certain format (eg. ISO 9660 for CDs). There may also be bitrate limitations because of the speed the DVD player can read from CD/DVDs. For example, my DVD player only supports 1500 kbit/s (187.5 KB/s) for CDs and 3000 (375 KB/s) kbit/s for burned DVDs. Burned DVDs also have to be less than 4 GB in size for my DVD player.
- There might also be a file size limit. A single AVI file normally shouldn't exceed 2 GB. You can use this guide to cut/split your AVI files.
First up, we need to find some information about the AVI file, to ensure that you either match the size of the original file, or to see if the original file's bitrate is too high (see "Reasons for Incompatibility" above). We'll use GSpot, as it give you most of the information you'll need later on. Load the avi file you wish to re-encode into GSpot and write down (or do a screen capture, if you are capable):
- the original bitrate (red) (in kilobits per second)
- the "runtime" (hours:minutes:seconds)
- the "FPS" (frames per second)
- the audio bitrate
The reason you need all of this information is to use it later in a bitrate calculator to set the size of the re-encoded AVI file (eg. if you need the file to fit onto a CD). In actual fact, you can simply enter the "the original bitrate" listed in GSpot into the DivX/XviD codec, and you should get roughly the same sized file, but it won't be as precise as using the built in calculators for the codecs.
After you have gotten it all down, you can close GSpot. (Screen Shot Below)

Now start up VirtualDub and load the avi file you wish to re-encode. Select the "Audio" drop down menu at the top (red). Ensure "Source audio" (blue) and "Direct stream copy" (green) are selected.
"Source audio" should be selected by default, and it simply means that VirtualDub will use the audio that was found within the loaded AVI file (as opposed to "No Audio", which uses no audio for the output, and "WAV audio", which allows you to replace the current audio with the audio in a WAV file).
"Direct stream copy" (like the video equivalent) simply means that no processing will be done on the audio, and it will be copied over bit for bit from the loaded AVI file, maintaining the original quality and will be very quick. (Screen Shot Below)


